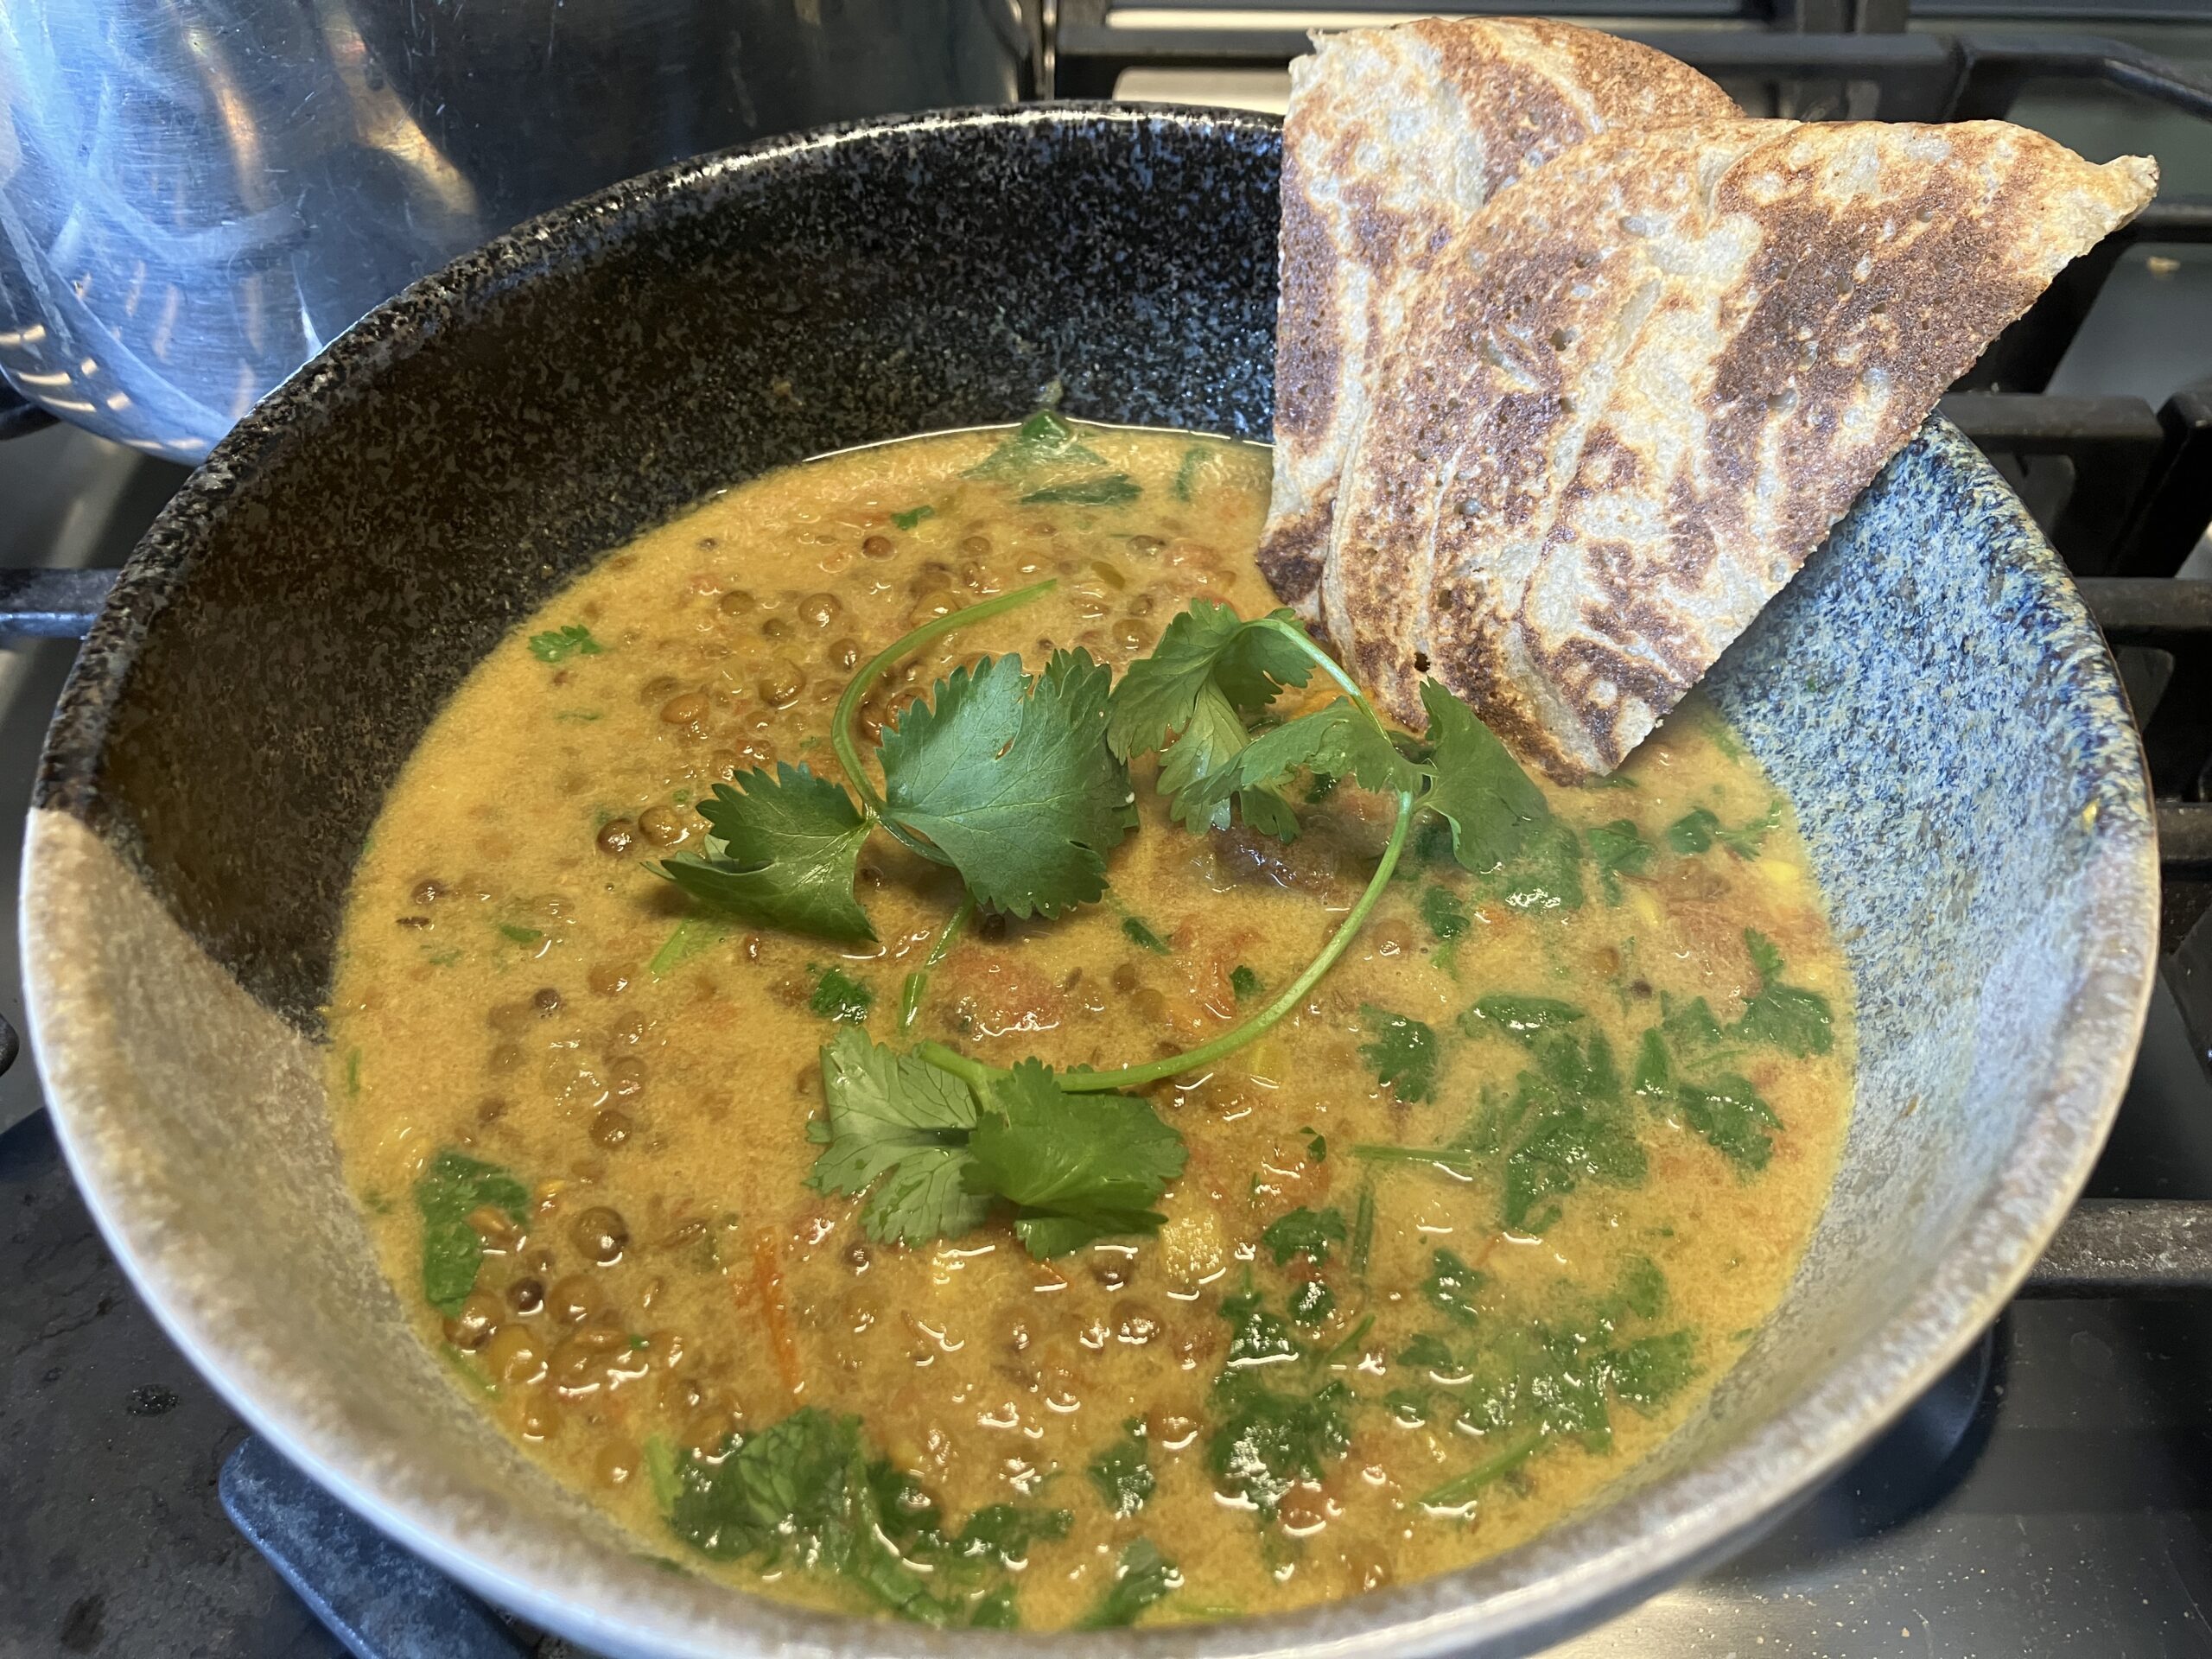
Category: Dinner

  • Asian Style Marinated Adzuki Beans

    Asian Style Marinated Adzuki Beans

    Asian-Style Marinated Adzuki Beans

    Adzuki beans are small red beans commonly used in East Asian cooking. While they’re often found in sweet dishes, they also work beautifully in savoury recipes. In this dish, the beans are gently sautéed with garlic, ginger, and onion, then marinated in a bright mixture of tamari, lime, and sesame for a simple Asian-inspired side. It’s a quick, protein-rich dish that tastes even better after the flavours have had time to mingle.
    Course Main Course, Side Dish
    Total Time 45 minutes
    Servings 4

    Ingredients

    • 1 medium red onion or 4–5 green onions, finely chopped
    • 3 large cloves garlic minced
    • 1 tsp freshly grated ginger
    • 1 ½ cups cooked adzuki beans about 1 can, drained and rinsed
    • 1 ½ Tbsp low-sodium tamari or coconut aminos
    • 1 Tbsp freshly squeezed lime juice
    • 1 Tbsp tahini or smooth almond butter for creaminess instead of oil
    • 1 tsp toasted sesame seeds
    • 1 ½ tsp rice vinegar optional, for extra brightness
    • Red pepper flakes or a few drops of chili sauce optional
    • Chopped cilantro or Thai basil for garnish
    • Pinch sea salt optional

    Instructions

    • Sauté aromatics without oil: Warm a splash of water or low-sodium veggie broth in a skillet over medium-high heat. Add onion (or green onion whites), cook 2–3 min. Stir in garlic and ginger, cooking 30–60 sec. Add extra broth as needed.
    • Make the dressing: In a bowl whisk tamari, lime juice, tahini or almond butter, sesame seeds, and rice vinegar if using. Add 1–2 tsp water to loosen.
    • Combine Everything: Add beans to the skillet, pour over dressing, and toss until coated and warm.
    • Marinate: Let sit at least 30 min (or refrigerate up to 24 h).
    • Top with chopped cilantro/Thai basil, the green parts of the onions, and a sprinkle of sesame seeds or chili flakes. Season with a pinch of salt if needed.

    Notes

    Adzuki beans

    Adzuki beans have a slightly sweet, nutty flavour and a soft texture that absorbs marinades well. They’re also easier to digest than many other beans for some people.
    Make ahead

    This recipe actually improves with time. Letting the beans marinate for 30 minutes, or even overnight in the fridge, allows the flavours to deepen.
    Oil-free tip

    Instead of oil, tahini (ground sesame seeds) add richness and a subtle sesame flavour while keeping the recipe whole-food, plant-based.
    Bean substitutions

    If you don’t have adzuki beans, small beans like black beans or mung beans can work. Adzuki beans are naturally a bit sweeter, which balances the salty and tangy marinade nicely.
    Serving ideas

    Serve over brown rice or quinoa, spoon onto a grain bowl with steamed greens, or tuck into lettuce wraps with shredded carrots and cucumber. Add to a noodle salad with soba or rice noodles.
  • Warm Lentil & Sweet Potato Salad

    Warm Lentil & Sweet Potato Salad

    Warm Lentil & Sweet Potato Salad

    This warm lentil salad is a simple, nourishing bowl built from everyday whole-food ingredients. Tender steamed sweet potato, hearty lentils, vibrant spinach, and a tangy splash of balsamic come together to create a balanced, fibre-rich dish that supports steady energy and gentle digestion. It’s quick enough for weeknights, versatile for meal prep, and endlessly adaptable with whatever vegetables or herbs you have on hand. Enjoy it as a satisfying plant-based meal on its own or as a colourful side that brings comfort and nutrition to any table.
    Course Main Course, Salad, Side Dish
    Total Time 15 minutes
    Servings 4

    Ingredients

    • 2 Sweet Potato medium, peeled and cut into small cubes
    • 1 1/3 cups Vegetable Broth divided
    • 1 cup Red Onion chopped
    • 3 Garlic cloves, minced
    • 4 cups Baby Spinach
    • 4 cups Lentils cooked, rinsed
    • 1/4 cup Balsamic Vinegar
    • 1/2 cup Parsley chopped, optional

    Instructions

    • Place sweet potato in a steamer over boiling water, cover, and cook for 8 to 10 minutes or until tender.
    • Meanwhile, add half of the broth to a large pan with the onions and garlic. Cook over medium heat until the onions have softened, about 3 to 5 minutes. Add the salt and stir to combine. Wilt in the spinach.
    • Add the lentils, balsamic vinegar, and the remaining broth. Continue to cook over medium heat for about 5 minutes more until most of the liquid has been absorbed.
    • Remove the pan from the heat and stir in the steamed sweet potato and parsley. Divide into bowls and enjoy!

    Notes

    Swap the sweet potato
    Butternut squash, carrots, or parsnips work well in place of sweet potato. Just keep the bite-sized cubes for even cooking.
    Use different greens
    Baby kale, chard, or finely shredded lacinato kale can be used instead of spinach. If using heartier greens, sauté an extra few minutes to soften.
    Try other lentils
    Brown or green lentils hold their shape best, but French (Puy) lentils are also great for texture. Avoid red lentils, which will break down and make the salad mushy.
    Add fresh herbs
    Swap or add herbs such as cilantro, dill, or basil for a different flavour profile.
    Bump up the acidity
    If you like a brighter dressing, add a splash of lemon juice or a teaspoon of Dijon mustard with the balsamic.
    Make it a meal
    Add pumpkin seeds, hemp hearts, cooked quinoa, or roasted chickpeas for more protein and crunch.
    Add aromatics
    A pinch of smoked paprika, cumin, or chili flakes meshes nicely with the sweet potato and lentils.
    Serving suggestion
    This salad is excellent warm, but also holds up well chilled for meal prep. It thickens slightly as it sits.
    Leftovers
    Refrigerate in an airtight container for up to four days. Reheat with extra vegetable broth if lentils become too dry.

  • Pressure Cooker Squash & Pear Soup

    Pressure Cooker Squash & Pear Soup

    Pressure Cooker Squash & Pear Soup

    This cozy, golden-hued soup is pure comfort in a bowl, simple, nourishing, and gently sweet from the addition of pear. The butternut squash brings a velvety texture and a dose of beta-carotene, while sage and garlic add depth and warmth. It’s a beautiful way to celebrate autumn produce and makes a quick, satisfying meal that feels both grounding and light.
    Course Main Course, Soup
    Total Time 30 minutes
    Servings 4

    Ingredients

    • 4 cups Butternut Squash peeled, chopped
    • 3 Garlic cloves
    • 2 Pear peeled, seeds removed, roughly chopped
    • 1 Carrot chopped
    • 1 Yellow Onion chopped
    • 1 tsp Ground Turmeric or 1 tbsp fresh, grated
    • 1 tbsp Fresh Sage optional
    • 1/2 tsp Sea Salt optional
    • 2 cups Vegetable Broth plus more if needed

    Instructions

    • Add all of the ingredients to the pressure cooker and close the lid.
    • Set to “sealing”, then press manual/pressure cooker and cook for 10 minutes on high pressure. Once it is done, release the pressure manually. Remove the lid carefully and let the soup mixture cool slightly.
    • Using a hand blender, puree the soup until smooth. Add additional broth if needed until the desired consistency is reached.
    • Divide between bowls and enjoy!

    Notes

     
    • Squash variations: While butternut squash is classic for this soup, feel free to use other winter squash like kabocha, delicata, or acorn. Each will bring its own subtle sweetness and texture, just adjust the cooking time slightly if your squash is particularly dense.
    • Flavour balance: The pear adds gentle sweetness that complements the earthy squash. For a little extra brightness, stir in a splash of lemon juice or apple cider vinegar before serving.
    • Pear: Bosc pears were used for this recipe. Firm, not overly ripe, pears yield the best results.
    • Texture: If you prefer a creamier soup, blend in a few tablespoons of coconut milk or a small cooked potato before pureeing.
    • Herb options: Sage gives a lovely autumn aroma, but you could also try thyme, rosemary, or a bit of ginger for a warmer, spicier note.
    • Consistency check: Start with the listed 2 cups of broth, then thin with more as needed after blending, the soup will thicken slightly as it cools.
    • No Hand Blender: Use a blender or food processor instead.
    • Serving ideas:
      • Garnish with pumpkin seeds or a sprinkle of smoked paprika, fresh ground black pepper or red pepper flakes.
      • Pair with crusty whole grain bread or a light green salad for a balanced meal.
    • Storage: Keeps well in the fridge for up to 4 days or freeze in portions for up to 3 months. Reheat gently and add a little water or broth if it thickens too much.
    • Make it on the stovetop: If you don’t have a pressure cooker, simmer everything in a covered pot for 25–30 minutes, or until the vegetables are very tender, then blend.
  • Chipotle – Maple Butternut & Tofu Sheet Pan Meal

    Chipotle – Maple Butternut & Tofu Sheet Pan Meal

    Chipotle – Maple Butternut & Tofu Sheet Pan Meal

    Bring the farmers’ market to your oven with this smoky-sweet sheet pan dinner! Roasted butternut, peppers, onions, tomatoes, and crispy-edged tofu caramelize under a chipotle-maple glaze while they bake, so easy and so colourful. Don't worry about extras, because tomorrow’s leftovers shine in wraps, grain bowls, or over a pile of leafy greens. Packed with plant protein, fibre, and beta carotene, it’s a cozy way to eat the rainbow.
    Course Main Course
    Servings 4

    Ingredients

    • 1 small butternut squash peeled and cut into ¾-inch cubes
    • 1 block extra-firm tofu drained, pressed, and cut into 1-inch cubes
    • 1 large red onion sliced into thick wedges
    • 2 bell peppers any color, cut into 1-inch strips
    • 2 tomatoes cut into wedges (or sub a handful of cherry tomatoes)
    • 3 cloves garlic minced
    • 3 Tbsp pure maple syrup
    • 3 Tbsp balsamic vinegar or lemon juice
    • 1 tsp smoked paprika
    • 2 tsp chipotle chili powder adjust for heat
    • freshly ground black pepper to taste
    • optional garnish: chopped cilantro or parsley, squeeze of lime

    Instructions

    • Preheat oven to 425°F. Line a large sheet pan with parchment paper or a silicone mat.
    • In a small bowl, whisk together maple syrup, balsamic vinegar or lemon juice, smoked paprika, chipotle powder, and garlic.
    • Place the cut squash into a large bowl and pour roughly ½ the marinate over it, tossing well to coat.
    • Spread squash out in a single layer on prepared pan and roast for 25 minutes.
    • Meanwhile, add the tofu to the same large bowl and toss with the remaining marinade. Set aside while you prepare the onion, peppers, and tomatoes.
    • After the squash has cooked for 25 minutes, remove from the oven and stir.
    • Add the onions and peppers to the tofu and toss to coat. Place this mixture on the prepared pan with the squash. Bake for 10 minutes.
    • Remove from oven, give everything a stir, then add the tomatoes and bake for another 10-15 minutes or until the squash is tender.
    • Taste, adjust seasoning, and finish with herbs or lime if desired.

    Notes

    • Serving ideas: Spoon over brown rice, millet, quinoa, or greens, and drizzle with a quick tahini–lime sauce for extra creaminess. I also love it with salsa on the side for dipping!
    • Buddha Bowl Magic: Leftovers make a perfect base for a quick Buddha bowl, just add cooked grains, leafy greens, or a dollop of hummus.
    • Veggie Swap: Mix it up with other roast-friendly vegetables such as sweet potatoes, parsnips, broccoli or cauliflower.
    • Protein Boost: Toss in a cup of cooked chickpeas along with the tofu for extra protein and texture.
  • Baked Zucchini Chickpea Fritters

    Baked Zucchini Chickpea Fritters

    Baked Zucchini Chickpea Fritters

    Zucchini is one of those vegetables that shows up in abundance in the summer and it’s a wonderful way to add lightness, fibre, and hydration to your meals. These baked zucchini chickpea fritters are a nourishing option when you want something satisfying but not heavy. They’re plant-based, naturally gluten-free, and baked instead of fried, so you get all the flavour with a lighter touch. I like them as a quick lunch with a dollop of salsa, on top of a salad for extra protein, or tucked into a wrap when I need something portable. They also keep well, making them a simple meal-prep option you can enjoy throughout the week.
    Servings 10 fritters

    Ingredients

    • 2 medium zucchinis grated (about 2 cups)
    • 1/2 tsp sea salt to draw out water from zucchini
    • 1 1/2 cups chickpeas 15 oz can
    • 1/4 cup oat flour or chickpea flour
    • 2 tbsps ground flax seed
    • 3 tbsps water
    • 1 tbsp lemon juice
    • 3 garlic cloves minced
    • 1/4 cup red onion chopped (or green onion)
    • 1/4 cup parsley or fresh dill
    • 1 tsp cumin
    • 1 tsp smoked paprika
    • 2 tbsps nutritional yeast optional

    Instructions

    • Prep the zucchini: Grate zucchini and sprinkle with 1/2 tsp salt. Let sit in a bowl for 10–15 minutes. Then, using a clean kitchen towel or cheesecloth, squeeze out as much moisture as possible.
    • Make the flax egg: In a small bowl, mix ground flaxseed with 3 tbsp water. Let sit for 5–10 minutes until it gels.
    • Mash chickpeas: In a large mixing bowl, mash the chickpeas with a fork or potato masher, leaving a few chunks for texture.
    • Mix everything: Add the squeezed zucchini, flax egg, oat flour, lemon juice, garlic, onion, parsley, cumin, paprika, and optional nutritional yeast to the mashed chickpeas. Stir until well combined. Season with salt and pepper to taste.
    • Let the mixture rest: Cover the bowl and let the mixture sit for 10–15 minutes. This allows the flour and flax to absorb moisture and makes the mixture easier to shape.
    • Form patties: With damp hands, shape the mixture into small patties (about 10-12). If the mixture still feels too wet, add a bit more flour, 1 tablespoon at a time.
    • Bake: Place the patties on a parchment-lined baking sheet. Bake at 400°F for 20 minutes, then flip and bake for another 15–20 minutes until golden brown and firm.
    • Cool and serve: Let the fritters cool slightly before serving. They firm up even more as they cool.

    Notes

    Squeezing zucchini is key: The more water you press out, the firmer your fritters will be.
    Rest the batter: Don’t skip the 10–15 minute rest before shaping. It helps everything bind.
    Serving ideas: Topped with salsa or a lemon-tahini sauce, in a wrap with greens, on a salad for added protein, as a burger patty substitute.
    Storage: Store leftovers in an airtight container in the fridge for up to 4 days.
    Reheating: Warm fritters in a 375°F oven for 8–10 minutes, or in a skillet over medium heat until heated through and crisp. They can also be frozen (up to 2 months) and reheated straight from frozen.
  • Soothing Chickpea & Ginger Soup

    Soothing Chickpea & Ginger Soup

    This gut-friendly chickpea and ginger soup is one of those recipes you’ll come back to again and again. It’s easy on the digestive system, rich in fibre and plant-based protein, and comes together in under 30 minutes, perfect for busy days or when your gut needs a little extra care. Whether you enjoy it as-is, add some rice or noodles to make it heartier, or spice it up with a touch of curry powder, this simple soup adapts to your day.

  • Baked Tofu

    Baked Tofu

    Baked Tofu

    This is one of my basic recipes and I usually make some form of it every week. It is so versatile and can be used in so many dishes or eaten as is straight out of the oven. I often roast yam slices along with the tofu for my first meal and then make tacos out of the leftover tofu. Feel free to experiment with whatever seasonings you prefer!

    Ingredients

    • 1 block of tofu drained (I usually use firm or extra firm but medium also works although the cubes become more like bits which get even crispier!)
    • 2 Tbsp tamari
    • 2 Tbsp cornstarch
    • 1 tsp garlic powder
    • 1 tsp cajun seasoning
    • 1/2 tsp cumin
    • 1/2 tsp chipotle chili powder

    Instructions

    • Preheat oven to 425 degrees (or 400 degrees convection) and line a baking sheet with parchment paper.
    • Cut the tofu into slabs and arrange on a clean kitchen towel or layers of paper towel. Gently apply pressure to remove any moisture. This will help the tofu to brown and get crispy.
    • Cut the slabs into cubes and place in a bowl.
    • Add the tamari and toss to coat the cubes.
    • Add the cornstarch and seasonings. Toss again until all the cubes are evenly coated.
    • Spread the cubes out in a single layer on the baking sheet.
    • Bake in the oven for about 20 minutes until golden and crisp, turning once.

    Notes

    If you want crispier tofu, you can spray the cubes with a little cooking oil prior to putting them in the oven.
    Benefits: Tofu is my favourite protein source as there are so many varieties and textures. It can be used in so many ways. Tofu provides key micronutrients like manganese, calcium, vitamin B6, riboflavin, thiamine, vitamin K and selenium. Tofu is low in calories, with about 70 calories in 100 grams.
  • BB Burgers

    BB Burgers

    BB Burgers

    Ingredients

    • 1 cup grated beets loosely packed
    • 1 can 540 ml kidney beans, drained (save the aquafaba for mung bean omelettes)
    • 1/2 large onion chopped
    • 2 cloves garlic minced
    • 1/4 cup ground flax seeds
    • 1/2 tsp cumin
    • 1/2 tsp smoked paprika
    • 1/4 tsp cayenne pepper optional
    • 1/2 tsp freshly ground pepper
    • 1/2 cup walnuts chopped

    Instructions

    • Heat the oven to 375°F.
    • In a food processor, combine all the ingredients except the walnuts, processing until well combined but not completely uniform. You want some different textures. Remove the bowl from the processor and stir in the walnuts by hand.
    • Prepare a baking sheet with parchment paper. Pat the mixture into 6-8 patties and place on the baking sheet. Wet hands occasionally if the mixture is sticking to your hands.
    • Bake in the oven for 30 minutes, turning carefully at 20 minutes. The patties will be very soft until completely baked. Patties are cooked when golden in colour and crispy on the outside but they will still be fairly delicate.
    • Serve in a bun or a lettuce leaf. Top with your favourite condiments.

    Notes

    Patties freeze well for a couple of months. I usually warm them up in a fry pan on the stove or in the toaster oven.
  • Bean Chili

    Bean Chili

    Bean Chili

    Made a big pot of bean chili mostly following this recipe on @seriouseats.
    My modifications were: I water sautéed the onions instead of using oil, switched the soy sauce for tamari and used miso instead of the marmite.
    This is a fantastic recipe and it makes plenty of leftovers that freeze well for a quick dinner in the future.

    Ingredients

    • 3 whole sweet dried chiles like costeño New Mexico, or choricero, stems and seeds removed
    • 2 small hot dried chiles like arbol or cascabel stems and seeds removed (optional)
    • 3 whole rich fruity dried chiles like ancho mulato, negro, or pasilla, stems and seeds removed
    • 1 quart water
    • 2 whole chipotle chiles in adobo sauce with 2 tablespoons sauce from can
    • 2 14-ounce cans chickpeas
    • 1 28-ounce can whole tomatoes packed in juice
    • 2 tablespoons vegetable oil
    • 1 large onion finely diced
    • 3 cloves garlic grated on a microplane grater
    • 1 1/2 tablespoons cumin
    • 2 teaspoons dried oregano
    • 1 tablespoon soy sauce
    • 1 teaspoon marmite or vegemite
    • 2 14-ounce cans dark red kidney beans, drained, liquid reserved separately
    • 2 tablespoons vodka or bourbon
    • Kosher salt
    • 2 to 3 tablespoons masa

    Instructions

    • Add dried chiles to a large heavy-bottomed Dutch oven or stock pot and cook over medium-high heat, stirring frequently, until slightly darkened with intense, roasted aroma, 2 to 5 minutes. Do not allow to smoke. Remove chiles to small bowl and set aside. Alternatively, place dried chiles on a microwave-safe plate and microwave on high power in 15-second increments until pliable and toasted-smelling, about 30 seconds total. Transfer to a 2-quart microwave-safe liquid measuring cup or bowl. Add water and chipotle chiles, cover with plastic wrap, and microwave on high power until gently simmering, about 5 minutes. Remove from microwave and set aside. Transfer chiles and liquid to blender and blend, starting on the lowest possible setting and gradually increasing speed to high (make sure to hold the lid down with a clean kitchen towel or a potholder to prevent it from blowing out). Blend until smooth, about 1 minute.
    • A two-image collage. The top image shows a Dutch oven holding dried chiles, which are being toasted. The bottom image shows the toasted chiles and liquid now blended into a smooth puree inside of the bowl of a blender.
    • Drain chickpeas, reserving liquid from can. Transfer chickpeas to a food processor and pulse until just roughly chopped, about three 1-second pulses. Set aside.
    • Drained peas, with the liquid in a small cup to the left, pulsed until roughly chopped inside a food processor bowl.
    • Roughly squeeze tomatoes through your fingers into approximate 1/4-inch pieces. Add to chickpea water along with any juices.
    • A small stainless steel bowl holding chopped tomatoes, chickpea liquid, and juices.
    • Heat oil in a large saucepan or Dutch oven over medium-high heat until shimmering. Add onions and cook, stirring frequently, until softened but not browned, about 4 minutes. Add garlic, cumin, and dried oregano and cook, stirring constantly, until fragrant, about 30 seconds. Add puréed chiles, soy sauce, and marmite and cook, stirring constantly, until fragrant, about 30 seconds. Add reserved chickpea/tomato water mixture and stir to combine. Add chopped chickpeas and kidney beans. Stir to combine.
    • A two-image collage. The top image puréed chiles, soy sauce, and marmite stirred into onions inside the Dutch oven. The bottom image shows the reserved chickpea/tomato water mixture, chopped chickpeas, and kidney beans combined with the contents of the Dutch oven.
    • If beans are sticking out of the top, add reserved kidney bean liquid until just barely submerged. Bring to a boil over high heat, reduce to a bare simmer, and cook, stirring occasionally, until thick and rich, about 1 1/2 hours, adding more reserved kidney bean liquid as necessary if chili becomes too thick or sticks to the bottom of the pan.
    • A two-image collage. The top image shows the chili coming to a boil over high heat inside of the Dutch oven. The bottom image shows a hand holding a wooden spoon, stirring the chili.
    • Serious Eats / Julia Estrada
    • When cooked, add vodka or bourbon and stir to combine. Season to taste with salt and whisk in masa in a slow steady stream until desired thickness is reached. For best results, allow chili to cool and refrigerate for at least one night and up to a week. Reheat to serve.
    • A two-image collage. The top image shows a hand holding a small bowl containing vodka, which is being poured into the chili. The bottom image shows masa being poured into the Dutch oven, with a whisk there to incorporate it into the chili.
    • Serve, garnished with cilantro, chopped onions, scallions, avocado, lime wedges, and warm tortillas as desired.
    • A large bowl of chili on a blue dish towel. To the bottom left of the image is a plate holding tortillas, and in the top left corner is a plate with chopped cilantro and sliced limes.
  • Lentil Soup

    Lentil Soup

    Lentil Soup

    This lentil soup is packed with nutritional benefits and so fulfilling on a cold winter night. Lentils are an excellent source of protein, fibre, and iron, which support energy levels and digestive health. The carrots, celery, and tomatoes provide a boost of antioxidants and vitamins like vitamin A and C, while the garlic and spices add anti-inflammatory properties.
    Servings 4

    Ingredients

    • 1 onion diced
    • 2 carrots diced small
    • 2 celery stalks diced small
    • 4 cloves garlic minced
    • ½ tsp smoked paprika
    • 1 tsp oregano
    • 1 cup French lentils
    • 1 can crushed tomatoes 796 ml / 28 fl oz
    • 4 cups veggie or mushroom broth
    • Salt & pepper to taste optional
    • ¼ cup sherry totally optional and not wfpb!

    Instructions

    • In a large soup pot, heat 2–3 tablespoons of water over medium heat. Add the diced onion and sauté for 3–4 minutes, stirring occasionally, until softened and translucent. Add more water if needed to prevent sticking.
    • Stir in smoked paprika and oregano. Cook for about 30 seconds to 1 minute, stirring constantly, to release their aromas.
    • Add the diced carrots and celery to the pot. Cook for about 2 minutes, stirring occasionally, to allow the vegetables to begin softening.
    • Stir in the minced garlic and cook for another 1 minute, stirring frequently to prevent burning.
    • Add the lentils, crushed tomatoes, and broth to the pot. Stir well to combine.
    • Bring the mixture to a boil, then reduce the heat to low. Cover the pot and let the soup simmer gently for 25–30 minutes, or until the lentils are tender.
    • Once the lentils are cooked, taste the soup and season with salt and pepper as desired. If using sherry, stir it in at this stage and let the soup simmer for another 2–3 minutes.
    • Ladle the soup into bowls and serve hot. Pair with crusty bread or a fresh green salad for a hearty meal.

    Notes

    Sprinkle a tablespoon of nutritional yeast on the soup before eating. It adds a savoury, cheesy flavor and is a great source of B vitamins, including B12 (if fortified), as well as protein and fibre. It’s a simple way to enhance both flavour and nutrition!
    Feel free to experiment with spices to suit your taste. Try adding curry powder, turmeric, or a pinch of cayenne or red pepper flakes for some heat. The flavours are versatile and easy to customize!
    This soup freezes beautifully. Store it in an airtight container for up to 3 months. Reheat gently on the stovetop, adding a splash of water or broth if needed.