This gut-friendly chickpea and ginger soup is one of those recipes you’ll come back to again and again. It’s easy on the digestive system, rich in fibre and plant-based protein, and comes together in under 30 minutes, perfect for busy days or when your gut needs a little extra care. Whether you enjoy it as-is, add some rice or noodles to make it heartier, or spice it up with a touch of curry powder, this simple soup adapts to your day.
Category: Recipe
-

Soothing Chickpea & Ginger Soup
-

Granola Bars
Granola Bars
Makes 16 servingsIngredients
- 1 cup pitted dates
- 1 1/2 cups oats
- 1/2 cup almond flour
- 1/2 cup unsweetened shredded coconut
- 1/4 cup ground flax seed
- 1/4 cup pumpkin seeds raw
- 1/4 cup sunflower seeds raw
- 1/4 cup hemp seeds
- 1/4 cup blackstrap molasses
- 1/4 cup almond butter
- 1/4 cup unsweetened applesauce
- 2 tsps cinnamon
- 2 tsps vanilla
Instructions
- Preheat your oven to 350°F (175°C). Line an 8×8-inch baking pan with parchment paper.
- In a food processor, add the pitted dates and process until they are chopped into smaller pieces.
- Add the oats, almond flour, shredded coconut, ground flax seed, pumpkin seeds, sunflower seeds, hemp seeds, cinnamon, and vanilla extract. Pulse until the mixture is roughly combined.
- Add the blackstrap molasses, almond butter, and applesauce. Process until the dough is fully combined and begins to form a ball. Scrape down the sides as needed.
- Transfer the dough to the prepared pan. Using wet hands, press it evenly into the pan.
- Bake for 20–25 minutes, or until the edges are just turning golden brown.
- Allow to cool completely in the pan before cutting into bars.
Notes
Customize with Extras: Before transferring the dough to the pan, stir in up to ½ cup of add-ins. Chocolate chips are a favorite, but dried fruit like goji berries, raisins, or cranberries, or cacao nibs for a less sweet option, work beautifully too. Easier Cutting: Let the bars cool completely before slicing to help them hold their shape. A sharp knife or bench scraper works well for clean cuts. Storage Suggestions: Once cut, wrap each bar individually in parchment or reusable wraps. Store them in an airtight container in the fridge for up to 1 week, or freeze for up to 2 months. They’re perfect for a quick grab-and-go snack! -

Quinoa Greek Salad
Quinoa Greek Salad
This bright and hearty Quinoa Greek Salad is a whole-food, plant-based twist on the Mediterranean classic. With crisp veggies, briny olives, and a creamy lemon-herb dressing, it’s a refreshing, satisfying dish that’s as nourishing as it is delicious.Servings 4Ingredients
- 3 tbsp lemon juice freshly squeezed
- 1 tbsp red wine vinegar
- ½ tsp dried oregano
- 1 clove garlic finely chopped
- ¼ tsp freshly ground black pepper
- ¼ cup silken tofu
- 2 cups quinoa cooked
- 1 cup grape tomatoes halved
- ½ large bell pepper chopped into cubes
- ½ cup pitted kalamata olives
- 1 cup leafy greens romaine, kale, arugula, spinach, chard, bok choy, etc., finely chopped
- 1 small red onion halved and thinly sliced
- ½ English cucumber cut into small cubes
- Feta cheese optional
Instructions
- Whisk together the lemon juice, vinegar, oregano, garlic and pepper in a small bowl. Slowly whisk in the silken tofu until well combined and smooth. (Or put all ingredients into a small food processor and process until combined.)
- Gently toss the cooked quinoa, tomatoes, peppers, olives, greens, red onion and cucumber in a large bowl. Drizzle with the dressing and gently toss once again.
- Cover and refrigerate for at least an hour.
- Just before serving, top with a handful of feta if desired.
Notes
This salad travels well and tastes even better after the flavours meld—perfect for picnics, potlucks, and make-ahead meals. Want to keep it fully WFPB? Skip the dairy and try this easy Tofu Feta—it’s tangy, crumbly, and simple to make at home. Make extra quinoa earlier in the week so you can throw this salad together in minutes. -

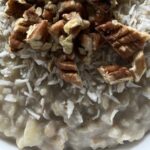
Coconut Steel Cut Oats
Coconut Steel Cut Oats
Makes 4-6 servingsIngredients
- 1 can coconut milk
- 1 2/3 cups soy milk 400 ml, same as the can of coconut milk
- 1 cup steel cut oats
- 2 bananas mashed
Instructions
- In a medium saucepan, bring the coconut milk and soy milk to a boil.
- Add the steel cut oats, reduce the heat to low, and simmer gently, uncovered, for 20 minutes, stirring occasionally.
- Stir in the mashed bananas and cook for an additional 5 minutes, or until the desired consistency is reached.
-

Nutty Oat Bliss Balls
Nutty Oat Bliss Balls
Sometimes, we all need a little bliss—and these no-bake bliss balls deliver just that. Packed with wholesome ingredients and naturally sweetened, they’re the perfect bite-sized treat to satisfy your sweet snack craving.Ingredients
- 1 cup pitted dates Medjool preferred
- 1/2 cup pecans
- 1/2 cup walnuts
- 1/2 cup unsweetened shredded coconut
- 1/2 cup peanut butter
- 1 cup oats
- 1/4 cup ground flax seed
- 1/3 cup soy milk or other plant-based milk
- 1 tsp vanilla extract
- 2 ozs dark chocolate chopped
Instructions
- In the bowl of a food processor, add the pitted dates and nuts. Process until the mixture is broken down into small pieces and becomes sticky.
- Add the coconut, peanut butter, oats, flaxseed, and vanilla. Process again until the mixture looks uniform.
- Add the soy milk and continue processing until the mixture comes together—it should be moist and hold its shape. Add more milk if needed to achieve this consistency.
- Remove the blade and stir in the chocolate chunks.
- Roll the mixture into 1-inch balls and place them on a parchment-lined plate. If desired, coat the balls in a topping such as cacao powder or shredded coconut. Refrigerate for about 1 hour, or until firm.
Notes
Leftovers: These can be stored in the fridge for up to two weeks or frozen for up to 3 months
Add-ons: Instead of the dark chocolate chunks, feel free to sub 1/3 cup chocolate chips or goji berries or dried mulberries. -

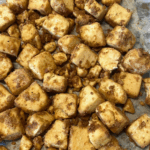
Baked Tofu
Baked Tofu
This is one of my basic recipes and I usually make some form of it every week. It is so versatile and can be used in so many dishes or eaten as is straight out of the oven. I often roast yam slices along with the tofu for my first meal and then make tacos out of the leftover tofu. Feel free to experiment with whatever seasonings you prefer!Ingredients
- 1 block of tofu drained (I usually use firm or extra firm but medium also works although the cubes become more like bits which get even crispier!)
- 2 Tbsp tamari
- 2 Tbsp cornstarch
- 1 tsp garlic powder
- 1 tsp cajun seasoning
- 1/2 tsp cumin
- 1/2 tsp chipotle chili powder
Instructions
- Preheat oven to 425 degrees (or 400 degrees convection) and line a baking sheet with parchment paper.
- Cut the tofu into slabs and arrange on a clean kitchen towel or layers of paper towel. Gently apply pressure to remove any moisture. This will help the tofu to brown and get crispy.
- Cut the slabs into cubes and place in a bowl.
- Add the tamari and toss to coat the cubes.
- Add the cornstarch and seasonings. Toss again until all the cubes are evenly coated.
- Spread the cubes out in a single layer on the baking sheet.
- Bake in the oven for about 20 minutes until golden and crisp, turning once.
Notes
If you want crispier tofu, you can spray the cubes with a little cooking oil prior to putting them in the oven. Benefits: Tofu is my favourite protein source as there are so many varieties and textures. It can be used in so many ways. Tofu provides key micronutrients like manganese, calcium, vitamin B6, riboflavin, thiamine, vitamin K and selenium. Tofu is low in calories, with about 70 calories in 100 grams. -

Basic Chia Pudding
Basic Chia Pudding
This is my most requested recipe. Enjoy!Makes 2 servings, can be easily doubled and stored in the fridge for up to 4 daysThis is my very basic recipe so be creative about add-ins. The possibilities are endless!Servings 2 servingsIngredients
- ¼ cup chia seeds
- 1 cup almond or other plant based milk
- 1 tsp maple syrup or honey optional
- 1 tbsp ground flax seeds
- 1 tsp cinnamon
Optional Add-ins
- 1 tsp pure vanilla extract
- ½ tsp nutmeg
- 1 tsp maca powder
- 1 tbsp cacao powder
- 1 tsp spirulina powder
- 1 tbsp poppy seeds
Instructions
- In a medium bowl, whisk to combine chia seeds, milk, sweetener, flax seeds, and cinnamon.
- Cover and refrigerate until thick, about 2 hours or overnight, giving it a stir once or twice.
- Top with fruit and pumpkin seeds and/or nuts.
Notes
Benefits: Chia seeds pack a super nutrient punch. They contain a large amount of fiber, protein and omega-3 fatty acids as well as many essential minerals and antioxidants. They may help improve digestive health, lower blood pressure, and improve blood sugar control. -

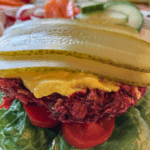
BB Burgers
BB Burgers
Ingredients
- 1 cup grated beets loosely packed
- 1 can 540 ml kidney beans, drained (save the aquafaba for mung bean omelettes)
- 1/2 large onion chopped
- 2 cloves garlic minced
- 1/4 cup ground flax seeds
- 1/2 tsp cumin
- 1/2 tsp smoked paprika
- 1/4 tsp cayenne pepper optional
- 1/2 tsp freshly ground pepper
- 1/2 cup walnuts chopped
Instructions
- Heat the oven to 375°F.
- In a food processor, combine all the ingredients except the walnuts, processing until well combined but not completely uniform. You want some different textures. Remove the bowl from the processor and stir in the walnuts by hand.
- Prepare a baking sheet with parchment paper. Pat the mixture into 6-8 patties and place on the baking sheet. Wet hands occasionally if the mixture is sticking to your hands.
- Bake in the oven for 30 minutes, turning carefully at 20 minutes. The patties will be very soft until completely baked. Patties are cooked when golden in colour and crispy on the outside but they will still be fairly delicate.
- Serve in a bun or a lettuce leaf. Top with your favourite condiments.
Notes
Patties freeze well for a couple of months. I usually warm them up in a fry pan on the stove or in the toaster oven. -
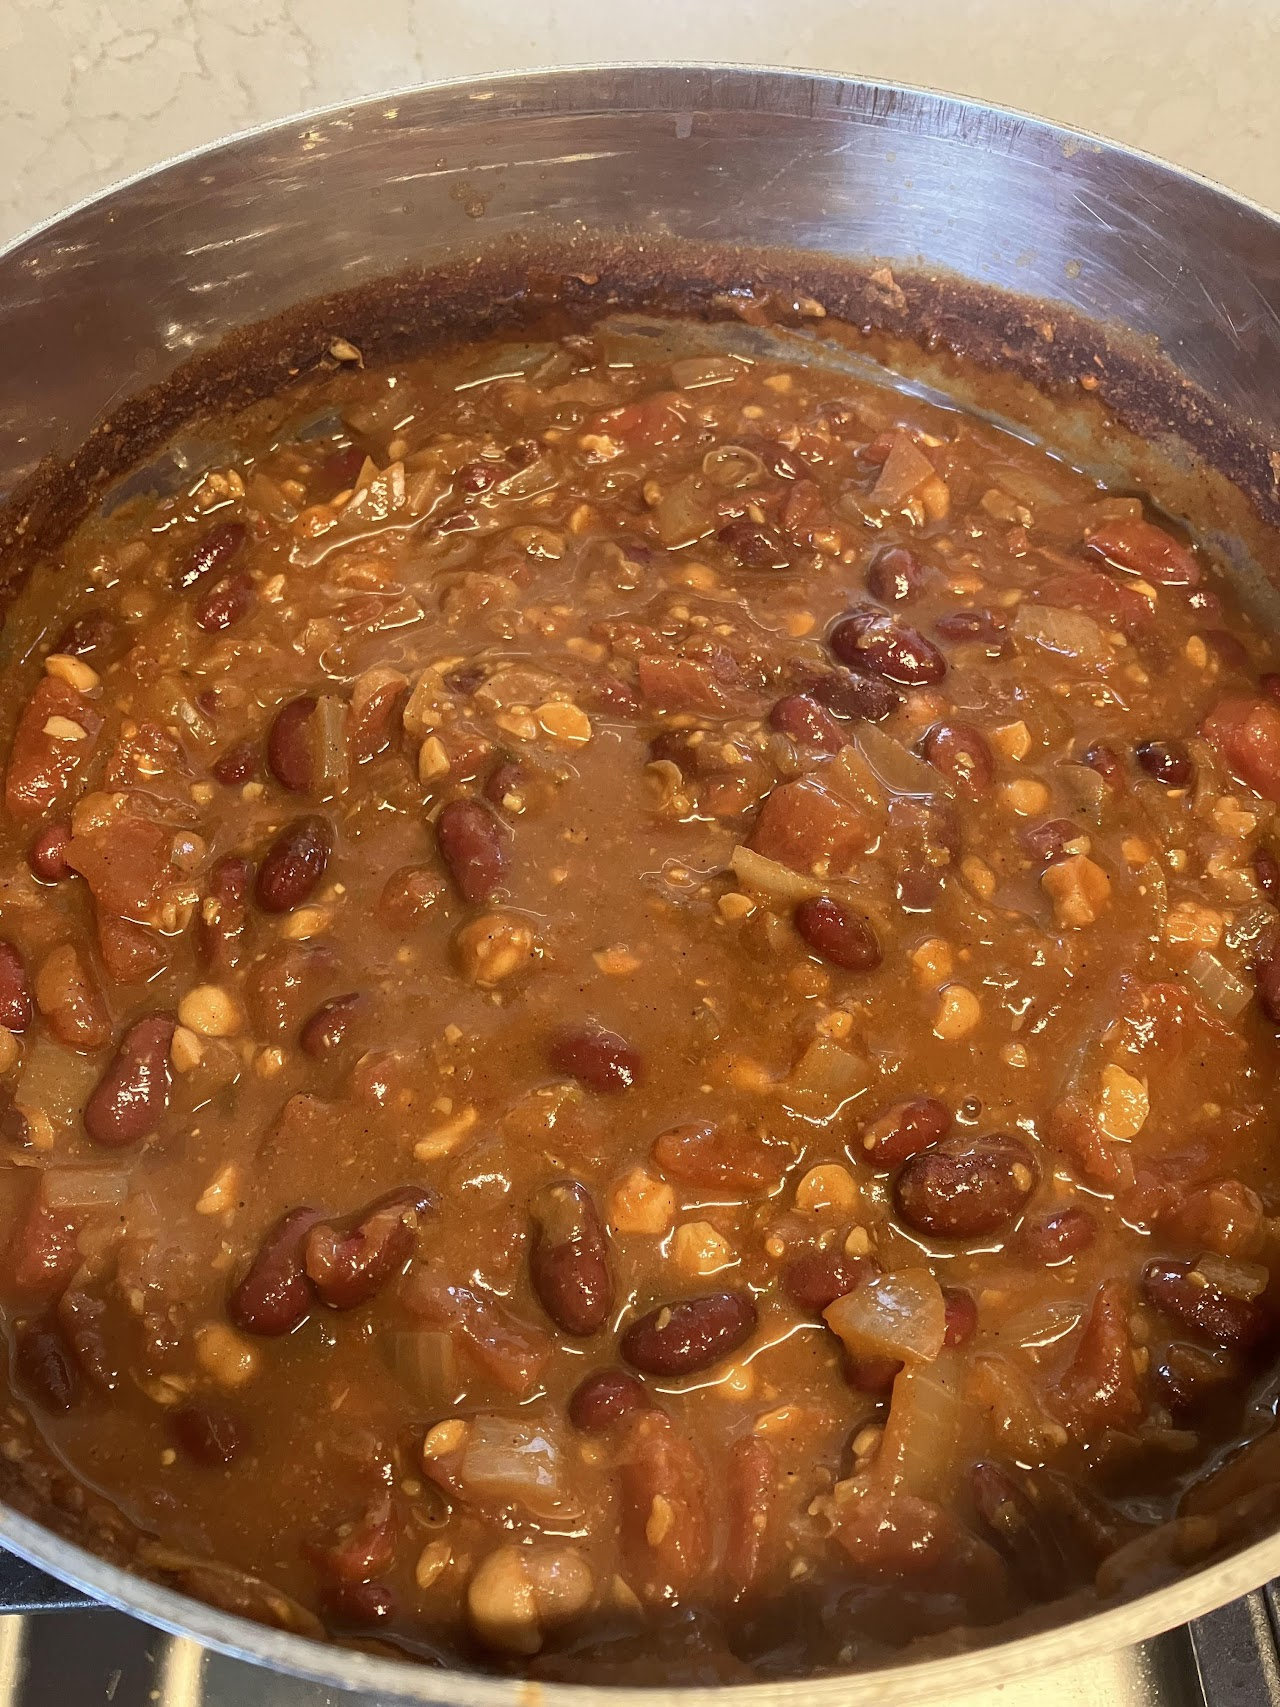
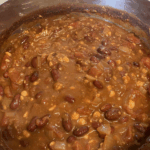
Bean Chili
Bean Chili
Made a big pot of bean chili mostly following this recipe on @seriouseats.My modifications were: I water sautéed the onions instead of using oil, switched the soy sauce for tamari and used miso instead of the marmite.This is a fantastic recipe and it makes plenty of leftovers that freeze well for a quick dinner in the future.Ingredients
- 3 whole sweet dried chiles like costeño New Mexico, or choricero, stems and seeds removed
- 2 small hot dried chiles like arbol or cascabel stems and seeds removed (optional)
- 3 whole rich fruity dried chiles like ancho mulato, negro, or pasilla, stems and seeds removed
- 1 quart water
- 2 whole chipotle chiles in adobo sauce with 2 tablespoons sauce from can
- 2 14-ounce cans chickpeas
- 1 28-ounce can whole tomatoes packed in juice
- 2 tablespoons vegetable oil
- 1 large onion finely diced
- 3 cloves garlic grated on a microplane grater
- 1 1/2 tablespoons cumin
- 2 teaspoons dried oregano
- 1 tablespoon soy sauce
- 1 teaspoon marmite or vegemite
- 2 14-ounce cans dark red kidney beans, drained, liquid reserved separately
- 2 tablespoons vodka or bourbon
- Kosher salt
- 2 to 3 tablespoons masa
Instructions
- Add dried chiles to a large heavy-bottomed Dutch oven or stock pot and cook over medium-high heat, stirring frequently, until slightly darkened with intense, roasted aroma, 2 to 5 minutes. Do not allow to smoke. Remove chiles to small bowl and set aside. Alternatively, place dried chiles on a microwave-safe plate and microwave on high power in 15-second increments until pliable and toasted-smelling, about 30 seconds total. Transfer to a 2-quart microwave-safe liquid measuring cup or bowl. Add water and chipotle chiles, cover with plastic wrap, and microwave on high power until gently simmering, about 5 minutes. Remove from microwave and set aside. Transfer chiles and liquid to blender and blend, starting on the lowest possible setting and gradually increasing speed to high (make sure to hold the lid down with a clean kitchen towel or a potholder to prevent it from blowing out). Blend until smooth, about 1 minute.
- A two-image collage. The top image shows a Dutch oven holding dried chiles, which are being toasted. The bottom image shows the toasted chiles and liquid now blended into a smooth puree inside of the bowl of a blender.
- Drain chickpeas, reserving liquid from can. Transfer chickpeas to a food processor and pulse until just roughly chopped, about three 1-second pulses. Set aside.
- Drained peas, with the liquid in a small cup to the left, pulsed until roughly chopped inside a food processor bowl.
- Roughly squeeze tomatoes through your fingers into approximate 1/4-inch pieces. Add to chickpea water along with any juices.
- A small stainless steel bowl holding chopped tomatoes, chickpea liquid, and juices.
- Heat oil in a large saucepan or Dutch oven over medium-high heat until shimmering. Add onions and cook, stirring frequently, until softened but not browned, about 4 minutes. Add garlic, cumin, and dried oregano and cook, stirring constantly, until fragrant, about 30 seconds. Add puréed chiles, soy sauce, and marmite and cook, stirring constantly, until fragrant, about 30 seconds. Add reserved chickpea/tomato water mixture and stir to combine. Add chopped chickpeas and kidney beans. Stir to combine.
- A two-image collage. The top image puréed chiles, soy sauce, and marmite stirred into onions inside the Dutch oven. The bottom image shows the reserved chickpea/tomato water mixture, chopped chickpeas, and kidney beans combined with the contents of the Dutch oven.
- If beans are sticking out of the top, add reserved kidney bean liquid until just barely submerged. Bring to a boil over high heat, reduce to a bare simmer, and cook, stirring occasionally, until thick and rich, about 1 1/2 hours, adding more reserved kidney bean liquid as necessary if chili becomes too thick or sticks to the bottom of the pan.
- A two-image collage. The top image shows the chili coming to a boil over high heat inside of the Dutch oven. The bottom image shows a hand holding a wooden spoon, stirring the chili.
- Serious Eats / Julia Estrada
- When cooked, add vodka or bourbon and stir to combine. Season to taste with salt and whisk in masa in a slow steady stream until desired thickness is reached. For best results, allow chili to cool and refrigerate for at least one night and up to a week. Reheat to serve.
- A two-image collage. The top image shows a hand holding a small bowl containing vodka, which is being poured into the chili. The bottom image shows masa being poured into the Dutch oven, with a whisk there to incorporate it into the chili.
- Serve, garnished with cilantro, chopped onions, scallions, avocado, lime wedges, and warm tortillas as desired.
- A large bowl of chili on a blue dish towel. To the bottom left of the image is a plate holding tortillas, and in the top left corner is a plate with chopped cilantro and sliced limes.
-

Chocolate Mousse Pie
Chocolate Mousse Pie
Looking for a rich, creamy, and indulgent dessert that’s also packed with wholesome ingredients? This Chocolate Mousse Pie is the perfect treat! With a naturally sweetened nut-and-date crust and a luscious, velvety chocolate filling made from silken tofu and cashews, this dessert is both satisfying and nourishing. Whether you’re serving it for a special occasion or just craving a chocolate fix, this no-bake pie is easy to make and sure to impress.Ingredients
Crust
- 1 cup raw almonds
- 3/4 cup raw pecans or walnuts or a combination of both
- 1 cup pitted dates
- 3 tbsp cacao powder
Mousse
- 1 cup silken tofu
- 1/2 cup raw cashews soaked
- 1/2 cup plant-based milk
- 1/2 cup dates pitted
- 1/8 cup pure maple syrup
- 1/3 cup cacao powder
- 1 tsp vanilla extract
Instructions
- For the crust:
- Place the almonds in a food processor and pulse briefly until fine and crumbly.
- Add the remaining crust ingredients and process until the mixture becomes sticky, scraping down the bowl as needed.
- The mixture should stick together when pressed with your fingers. If it’s still a little dry, add a teaspoon of water and process again.
- Transfer the mixture to a pie plate and press evenly into the pan.
- For the mousse:
- Place all the filling ingredients in a high-powered blender and blend until completely smooth, ensuring no texture of dates or cashews remains. Scrape down the blender several times as needed.
- Pour the filling into the crust and smooth the top with a spatula to distribute it evenly.
- Refrigerate for a couple of hours (or overnight) to set.
Notes
For a less intense chocolate flavour, cocoa powder can be substituted for the cacao powder.
Since Medjool dates are expensive, I used soaked baking dates for the crust and reserved Medjool dates for the mousse.
This pie is great served with a topping of pureed raspberries.